Ice fishing, Part II

The other day I wrote horror stories about ice fishing. I figured I’d better follow up with a how-to ice fishing article in case someone still had a death wish and wanted to go! I’m headed to Texas next week for a hog hunt using the Umarex Air Sabre (which is an airgun that shoots arrows). Due to being AWOL, I had to submit this story early. By the time it publishes, ice will probably be melting at CJ so you’ll probably have to go up to a mountain lake to ice fish.

It’s according to how serious you want to get. If you’re going to go every weekend, you’ll need to accumulate more gear than I’m going to recommend. You see pictures of ice fishermen up in the Northeast that have ice fishing shanties out on the ice. We won’t cover that angle.

If you’re going to ice fish regularly, I’d recommend a portable pop-up hut. You set on a bench and there are holes in the floor to line up with the holes you’ve drilled in the ice. I’ve never used any of these so sorry, I don’t know a good one to recommend.

I’ve always wondered, but never have tried it, why wouldn’t a cheap little dome tent work? Set it up and fish in it? But who knows, the bottom of the tent may freeze to the ice and become a permanent fixture until spring! So, this idea may not work.

To haul out my gear I use a cheap little red kid’s sled. Load on your gear, tie a rope on front to drag it and off you go. It should hold all of your gear but if not, throw the rest into a backpack. It’s smart to take a 20-foot rope with a thick diameter. That way if someone falls in you can throw it to them and drag them out.

I always carry a 5-gallon bucket to set on. Yes, a chair would be more comfortable but you can throw your gear in the bucket and then set it in the sled. If it’s cold you may want to take a tent heater. Or, you can build a fire.

Then, of course, you’ll need an ice auger. I have a cheaper hand auger but if you’re going to be fishing much a gas auger would be better. If they’re not biting, you need to move. Maybe you can’t troll when ice fishing but if you have a gas auger you can move more/faster. You’ll also want an ice scoop to scoop the slush out of the hole after drilling it. You’ll also use the scoop to break up ice as it starts forming on the surface of your hole.

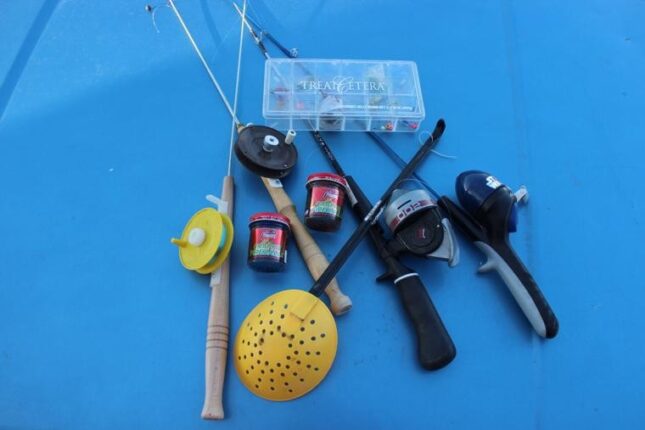
Now for the important items. If you’re going to be drilling a lot of holes, you may want to buy cheap tip-ups to save money. I personally favor regular rods and reels. But you don’t want your regular fishing rods. You’ll want to use the short ice fishing rods. Again, I’m not a 24/7 ice fisherman so I buy cheap ice fishing rods and reels but like with all fishing, you’ll cuss less and fish more if you use quality reels.

Like with all fishing, no one lure is the silver bullet. No siree, the manufacturers have convinced us that we need a multitude of lures of different sizes and colors. I usually use the little ice fishing jigs and tip them off with a meal worm. Or, I’ve got a variety of Pautzke’s Fireballs that you can put on the jig. They’re colored and scented to help attract fish. And, they don’t die like worms do. So you can keep a bottle for … I don’t know how long, but years. That’s probably your best option because a worm isn’t going to be too lively in the frigid water below anyway, right?

For perch, I usually drop down to the bottom and reel up 8-12 inches. But like all fishing you have to check all of the water column to find out where the fish are. They even offer fish finders for ice fishermen. I’ve never used one, though, so I can’t tell you anything about them.

One good thing about ice fishing, you don’t need a stringer or a live well. Kick a little snow in a pile and throw your fish in the snow and you’re good to go. Then when you leave, just throw them into your bucket.

One last tip: due to the cold water, the fish will be a little lethargic so don’t fish your lure fast. And yes, you can jig up and down but do it slower than normal. Have fun.

Tom Claycomb lives in Idaho and has outdoors columns in newspapers in Alaska, Idaho, Utah, Nevada, Colorado and Louisiana. He also writes for various outdoors magazines and teaches outdoors seminars at stores like Cabela’s, Sportsman’s Warehouse and Bass Pro Shop. He can be reached via email at smileya7@aol.com.

New snow the perfect excuse for Bear Gulch

At least once a winter we make our annual pilgrimage to Bear Gulch and ski along the canyon rim to Lower Mesa Falls.

About every other year we get to feeling our oats and ski to the Upper Falls and back (nearly 10-mile round trip).

Bear Gulch is a popular winter destination about 17 miles east of Ashton on Highway 47 (also known as the Mesa Falls Scenic Highway). The highway is plowed up to the trailhead. Beyond that, it is groomed for snowmobiling and cross-country skiing.

The winter trailhead parking area can be packed with mostly snowmobilers and a few cross-country skiers on weekends. The trailhead is a Park ’N Ski trailhead.

This past week my sweetheart and I went on a weekday and almost had the place to ourselves. There were only a couple of vehicles in the football-field-sized parking lot.

The other nice thing about going in the middle of last week was that about 3 to 4 inches of snow had fallen the night before and improved the skiing experience.

On the downside, the temperatures were chilly, especially with a slight breeze. We had to wear buffs over our faces and robust beanies to fend off the single-digit temperatures.

The trail leaves the parking lot and follows up the road for about a third of a mile. On the left, look for a trail sign announcing a ski trail and telling snowmobilers to keep out.

This ski trail roughly parallels the highway but follows the rim of the deep Henry’s Fork canyon. Because the trail winds along the canyon rim, it adds more mileage and ups and downs to the distance than simply following the highway.

On our visit, the trail was ungroomed and snowed over. Because the base beneath the new snow was mostly hard-packed, the skiing was still quick and pleasant. Following the trail isn’t too hard — just look for the blue diamond markings along the trees every 30 yards or so.

After about a quarter of a mile along the canyon rim, we were treated to the best reason to ski this trail in the wintertime: astounding beauty. The views along this trail are some of the best in all of Idaho, and that’s saying a lot.

With the sun out, bright blue skies, snowy trees and the sparkling waters of Henry’s Fork far below, there were moments of pausing and soaking in the sights.

For the most part, the trail is fairly easy. There are a few short whoop de doos that may give beginning skiers pause.

We stopped at the Lower Mesa Falls overlook area for our usual snacks and thermos of hot herbal tea.

From the parking lot to the Lower Mesa Falls overlook along the rim trail is about 3 miles one way.

If you continue on to the Upper Mesa Falls, expect to add another 1.25 to 1.5 miles, one way depending on the route you take. If you want a shortcut going back, just ski back along the road. This is not recommended on busy weekends because of all the snowmobile traffic ripping along at mach speed.

The Upper Mesa Falls is an impressive sight in the wintertime and a major stop-off for most snowmobilers.

It can be a major commitment for skiers because the side route down to the falls is all downhill, meaning you’ll have to ski back up the road on the way back.

If you’re looking for maps and directions for this and other nearby ski trails, you can find them in the guidebook “Eastern Idaho Sweet Spots” or online at the Caribou-Targhee National Forest website.

Jerry Painter is a longtime East Idaho journalist and outdoorsman.

Chilling tales about ice fishing

OK, I’m not a hard-core ice fisherman. I don’t want to be a little wimp but deep down, I don’t relish the idea of breaking through the ice. I don’t know which would be worse. Breaking through the ice or getting to survive and having to crawl out back up on the surface soaking wet and freezing cold! It’d be a toss-up.

Now mind you. I’ve experienced a lot of near-death experiences. But the older I get, the harder I try to stay alive. I haven’t broken a bone in … a few years now. Used to think you had to or you weren’t living life to the fullest.

But there’s something a little spooky about hearing that harmonic cracking sound reverberating across the lake as a crack comes racing across the lake and the ice semi cracks/splits between your feet.

Like I say, I hate to be a wimp but it’s just a little disconcerting.

I remember one time, not long after I graduated out of college, I took a job over in Nebraska. My buddy Mike Helzer wanted to go ice fishing. It had warmed up a little and the snow had melted so there was a little water on top of the ice.

I’d taken my pastor’s son with us. If a fish hit at one of the holes and we all three ran over to reel him in, the ice would somewhat sink down an inch or two and water would run out of the hole onto the top of the ice and we’d slightly sink down. Again, I hate to be a wimp but that is a little disconcerting.

The fishing was pretty good, the best I remember but … . I don’t think it was good enough to have been designated as my final spot on earth.

Then after that I moved to Colorado. A couple of buddies had some death wish to go up to the mountains and ice fish all night every year on the longest day of the year. Well, I got out of that ordeal but we did go up on a lake at 10,000 feet on New Year’s Day.

We were drilling holes to fish and my buddy Mike Trautner was setting up an ice house. We were involved in drilling our holes and suddenly we heard some screaming. A stiff wind had whipped up and he was in the process of going airborne! We grabbed his ice house (with him in it) as it was sliding across the lake and rescued him.

But, all of our gear — 5-gallon buckets to set on, rods, gear AND my party trey with sausage, tomatoes and slices of cheese — had been blown away. We got Mike’s ice house staked down and then took a hike across the lake picking up gear.

But while walking across the lake there were little frozen red marbles, which I finally figured out were the little red tomatoes that were on my party tray. The slices of sausage were rolled for amazing distances like pinwheels all across the lake. My party trey was scattered to Kingdom come.

Luckily, there was a barbed wire fence on the far side of the lake, which stopped all of our gear from blowing to the Antarctic.

Then one more ice fishing horror story. Years ago, I attended a Winter Camping seminar at Sierra Trading Post put on by Brian… I can’t remember his last name. After attending his seminar, I came up with an ingenious idea. Why go winter camping with nothing else to do? Why not go winter camping on a lake and make it a joint ice fishing trip! I’m a genius. No, that’s not giving me enough credit. I’m a visionary genius. The only problem, I couldn’t find anyone dumb enough to go with me. None of my buddy’s were game. Surely Ron Spomer would go. Nope. Oh well, I’ll go by myself.

I threw my gear in a sled and on my backpack and hiked a mile or so out to an island and luckily set up my tent on the side of an island in case the wind whipped up. Which it did. It was by the grace of God that I didn’t go tumbling off but luckily, I was on (whatever it is??? The leeward side of the island). I thought my tent was going to take off rolling. The wind was howling. The next morning, I gingerly crawled out of the tent to surprisingly (not) find that all of my ice holes had frozen solid with my lines frozen in them.

Luckily, I had a tent heater and had survived the night. I caught a few fish that morning and finally gave up the ghost and headed for the truck. A guy on a snowmobile stopped by and fished with me for a while. When he was leaving, he asked if I wanted him to carry my gear to the truck. Naw. I’m fine … . I hiked to the truck and the road had drifted shut. There was a good 2 feet of snow. Luckily someone was behind me and had to help me get out or they wouldn’t have been able to leave. Gee, I love ice fishing!

Tom Claycomb lives in Idaho and has outdoors columns in newspapers in Alaska, Idaho, Utah, Nevada, Colorado and Louisiana. He also writes for various outdoors magazines and teaches outdoors seminars at stores like Cabela’s, Sportsman’s Warehouse and Bass Pro Shop. He can be reached via email at smileya7@aol.com.

Taking my sweetheart for a spin in the mountains

What my sweetheart Julie wants, she gets.

What she doesn’t want, she just says, “No.”

We’re not talking about fancy clothes or jewelry. I’d say, “Hey sweetie pie,” I was hoping the extra sugar would encourage her to jump on board with my idea. “Would you like to go cross-country skiing up at Kelly Canyon?”

“Nope,” she replied. “I’m waiting for some new snow.”

So lately, I’ve been going without her. She did have a point. While there has been plenty of snow in the backcountry to ski on, it has been hard and icy lately. That is until the most recent storm that passed through last Sunday and dropped about 3 to 4 inches of new white stuff.

So, I approached her again on President’s Day with the sweetest, most pleasant voice I could muster. (Since it’s out of my usual character, it kind of strained a vocal cord.)

“Hey sweet Julie, you want to go cross-country skiing up at Kelly’s?”

“How much new snow did they get?”

“I think about 3 or 4 inches.”

“OK.”

YIPPEE!

I dropped her off at the skier drop-off near the resort lodge, parked in the lower lot where the snowshoers and cross-country skiers park, and hiked up with her to the last ski lift.

From there, we skied up to the Y Junction and on to the Morgan Summit warming hut. With a fresh topping of powdery snow on top of a hard-packed base of almost 2 feet, the skiing was fast and pleasant.

At the warming hut, we paused for a snack and fired up the wood stove in case someone else was following behind us.

From the warming hut, we followed the marked route to the Pine Loop Trail. The route had been groomed and skied in the past but was now covered over with fresh snow. In some places where the wind had blown the snow around, the groomed path was only a memory. Not to worry, there are blue diamonds on the trees to mark the way.

After a few initial ups and downs, the Pine Loop Trail is mostly easy skiing. The route takes you through a deep forest of fir and occasional pockets of aspen trees. From the Morgan Summit warming hut, the Pine Loop Trail covers a little under 2 miles. It’s about 2 miles from the ski lodge to the hut (all uphill), making for about 6 miles altogether there and back. A map can be found on the Idaho Falls Ski Club’s website and also in the local guidebook “Eastern Idaho Sweet Spots.”

We experienced super quiet while skiing the Pine Loop. It was fun guessing what critters made which tracks in the snow. One small rodent had its sad tale told in the snow. You could follow its tracks for 20 or 30 yards, then the tracks abruptly stopped where a set of wing marks were made in the snow, left no doubt by a raptor descending from above. The bird of prey caught its breakfast.

We skied back to the warming hut, and then down the hill from Morgan Summit. Ours were the only tracks on the road except halfway down we came across fresh moose tracks trotting up ahead of us. The tracks weren’t there on the way up the hill. We could see where the moose must have heard us coming and left the road and continued up the hill and out of view. I imagined the giant standing off the road peeking behind a tree and spying on us as we skied by.

With each new snowstorm that passes by in the next few weeks, conditions should improve for cross-country skiing in the region.

Jerry Painter is a longtime East Idaho journalist and outdoorsman.

Packing a pistol: Tips on how to fly with firearms

Can you fly with a gun? Yes, but there are rules and regulations that you must follow. Some set by the government and some by each individual airline. We’ll cover some of the regulations … but first, if you’re new to the gun world you may ask the question: why would you want to fly with a gun?

I see three reasons right off:

1. You’re flying somewhere to hunt.

2. You’re a competitive shooter and flying to a match.

3. You want to have a gun for self-protection.

It doesn’t matter what the reason, the rules are the same. When you get to the ticket counter you have to declare that you have a firearm. They will ask you if it is unloaded and locked in a hard container. They will then have you sign and date an orange “Declaration Card” which is later taped to the gun box. In Boise, you will then be directed to go down to the left to have TSA check it out.

The firearm must be locked in a hard sided container. Many pistols come with a traveling case. For rifles, you will have to buy one. Forty something years ago Frontier Airlines would rent you a case for $20. The first time I flew with a rifle I was headed to Texas for a deer hunt. The ticket lady told me that if I didn’t bring it back that they’d keep my $20. She said if I wanted to keep it, she’d go get me a new one in a box.

Now, there are a plethora of gun cases to choose from. Most are lined with foam to protect your scoped rifles. These types of gun cases work fine but all that you can fit into them is your guns and maybe a knife or two. So you’re paying the airline for one bag that only has your guns in it.

Seven years ago I discovered a gun case made by Explorer that had no inner foam. They utilize a canvas carrying case. At first, I didn’t like it. I thought that’s stupid, it won’t protect my scope. But I used it on a trip to Alaska for a brown bear and duck hunt and fell in love with it. Here’s why.

When you go on a hunt, you have to take a ton of gear. Clothing — pants, shirts, base layers, coats, gloves, etc. etc. Then your guns, ammo, optics, knives, camera, maybe waders and the list goes on and on.

With my foamless case I could lay shirts/pants on the bottom, lay the canvas case on top with the guns in it and then lay more clothes on top. Wow. This was almost like having an extra bag of clothes. Plus, I could put my binoculars in the case and they’d be padded.

I fell in love with this concept of luggage. It is the only one like it that I’ve seen on the market. But what if you already own an expensive gun case and can’t (or don’t want to) buy another one? It just hit me while I’m sitting here typing but I guess you could remove the foam out of your existing case and be set. That’s better than flying a luggage half full of foam around the country!

So, if you go the above route, I’d recommend getting a canvas gun case to put your gun in to stick in the case. Plus, you can carry your gun around in the canvas case when hunting. For a pistol you can lock it in a smaller case and put in your unlocked suit case.

Some gun cases have holes for two locks. My Explorer case has holes for six locks which is a pain because Delta requires you to have a lock in every hole. You don’t want a real long necked lock because a thief may be able to pop open the closures on the gun case and be able to stick his hand into your case and pull something out (plus TSA will ding you).

On the other hand, I like longer necked locks to ensure that they can be locked. To alleviate any problems with TSA I carry a baggie of washers. I put a few on the backside of the neck of the lock and then lock the lock in place. Then, even if a thief opens the clasps on the case, he cannot pry open the top. I started doing this years ago.

I always carry 1-2 extra locks in case one malfunctions, which would be a disaster. I’ve never had a problem until … the other day. TSA wanted to open my case to inspect it upon arriving at their booth and for some reason the key wouldn’t work. No biggee. I let them cut the lock since I had an extra one.

What about ammo? Some airlines say ammo has to be in the original container but here is an excerpt from the TSA website:

• Small arms ammunition (up to .75 caliber and shotgun shells of any gauge) must be packaged in a fiber (such as cardboard), wood, plastic, or metal box specifically designed to carry ammunition and declared to your airline.

• Ammunition may be transported in the same hard-sided, locked case as a firearm if it has been packed as described above. You cannot use firearm magazines or clips for packing ammunition unless they completely enclose the ammunition. Firearm magazines and ammunition clips, whether loaded or empty, must be boxed or included within a hard-sided, locked case.

• Please check with your airline for quantity limits for ammunition.

You can carry your ammo in the original box but over time, a factory cardboard box starts to deteriorate. I just discovered some lightweight plastic containers called Ammo Buddy made by Clamtainer. That’s what I use now. They’re also great to carry extra ammo while backpacking or packing into elk camp. I would classify them as somewhat water resistant, at least as compared to a factory cardboard box.

As far as I can tell TSA doesn’t limit you on how much ammo you can carry but airlines seem to set their own limits. Delta allows up to 11 pounds and in the past United has told me they allow 10 pounds.

Tom Claycomb lives in Idaho and has outdoors columns in newspapers in Alaska, Idaho, Utah, Nevada, Colorado and Louisiana. He also writes for various outdoors magazines and teaches outdoors seminars at stores like Cabela’s, Sportsman’s Warehouse and Bass Pro Shop. He can be reached via email at smileya7@aol.com.

Getting fat on a winter hot springs ride

There are four main means of transportation people use to cover the 10 miles of snowy road to Granite Creek Hot Springs in the wintertime: snowmobile, sled dogs, cross-country skis and fat tire bike.

Last week, my friend Joe Hill and I chose fat bike.

Although we are both avid cyclists (Joe owns the Sled Shed ski and bike shop in Rexburg), neither of us owns a fat bike. So, we rented bikes for the day. Many bike shops in the area rent bikes. Joe picked up a pair from the Outdoor Resource Center at Brigham Young University-Idaho, and we met early in the morning in Ririe for our drive to the winter trailhead a few miles south of Hoback Junction, Wyoming.

I have been up this beautiful mountain canyon a few times in the summer, but this was my first winter visit. The road is left unplowed in the winter and open only to snow travel. From trailhead to hot springs is about 1,000 feet of elevation gain, but there are several ups and downs both directions. The views along the way are typically spectacular with mountains in the distance and a pretty stream at the bottom of the canyon. Many sections of stream were frozen over with nearly a foot of ice.

If you talk to most fat bike riders, one of the biggest worries is the condition of the snow on the planned route. The week prior to the ride, the temperatures were bitter cold, hovering between minus 10 and 15. But when we decided to ride, the temperatures climbed to 30-plus degrees. If the snow is too soft, tires sink in and wheels feel like they are riding through glue.

At the trailhead we found scores of snowmobiles lined up in a large parking area. Most were commercially guided machines to take clients to see the sights. Near the trailhead and up a hill is a large barn announcing sled dog tours for hire.

We parked and sat for a minute discussing what to wear and not wear on the ride. The truck thermometer said it was 35 degrees. I was worried the snow was going to soften up and make riding challenging.

We dressed like we were cross-country skiing with several layers. I started riding with a beanie on under my bike helmet and a buff over my face. There was a slight breeze that made things chilly.

As we started down the road, there was that initial thrill you get of starting off on an adventure. We found that riding on the outer edge of the road proved to have the most solid snow. In the middle, snowmobiles had churned up the surface, making fat tires sink in. I noticed that the sled dog teams also chose the edge of the road.

After about a half-mile, which included a steady uphill section, we stopped and peeled off a layer of clothing. I also took off my beanie and buff. Despite shedding layers, I could still feel my under layers getting damp with sweat.

“I can tell I haven’t been getting much riding in this winter,” Joe said as we ground up another hill. Add to that a new baby that doesn’t sleep through the night and his fitness was not where he would like it.

Riding a fat bike over snow is a novel experience. We putted along at about an average speed of 7 to 8 mph. We stopped about every 15 or 20 minutes to snap photos and eat snacks.

After about an hour and 20 minutes, we came to Granite Creek Falls. We stopped and walked down to the creek and took photos. A couple was sitting in a natural hot pool on the other side of the creek below the falls. Unfortunately, to use that hot spring, you must walk through the frosty water.

The developed hot springs are about another 10 minutes of riding up the road. Here, the Forest Service operates a pool with changing rooms and benches. There is a caretaker on-site to take your $8.

At first we were the only ones in the pool, then a group of people who arrived by sled dog joined us in the pool. One talkative woman said they were a group of Rhodes scholars doing a travel trip as part of their program. She listed off several other trips they had taken in the area: Yellowstone National Park’s Old Faithful, the National Elk Refuge, cross-country skiing in West Yellowstone, Mont., riding the gondola at Snow King Ski Resort and marching around downtown Jackson, Wyo.

The typical reaction to seeing a person enter the pool was first an expression of uncertainty that quickly turned to smiles and, “Oh, this is nice!”

After a bit more than 30 minutes in the pool, we dressed, walked past the curious sled dogs and began riding down the road. By this time (early afternoon) a few things had changed. The snow was a bit softer and our bikes were acting more squirrelly and a strong head wind also fought against us. We had one major thing in our favor — the way back was mostly downhill. It ended up taking only about an hour to return back.

After my first go at fat biking Granite Creek, this trip might make the annual regular winter trip list.

For more information about Granite Creek Hot Springs, go to https://www.fs.usda.gov/recarea/btnf/recarea/?recid=71639.

Jerry Painter is a longtime East Idaho journalist and outdoorsman.

Taking cross-country skis into adventure territory

It’s what happens when I’m let off the leash.

Last week, I did two solo trips — one near Kelly Canyon and the other at the South Valley Trails area south of Victor.

At Kelly Canyon, I began skiing up the road headed toward the Y Junction. About a quarter of a mile up the road, I came to a snowshoe trail called the Big Slot. I reached into my bag of tricks and pulled out my climbing skins. It was just the thing when there’s no one there to tell me “that’s a dumb thing to do.”

Climbing skins come in all widths and lengths, and I purchased these several years ago from Black Diamond for my skinny skis. What happens is it basically turns your cross-country skis into snowshoes (only generally better). Once when skiing up to the top of Kelly Mountain near the warming hut, I put a set on my daughter’s skis. Her comment was, “This feels like cheating.” She was used to going up hills with lots of zig-zags and extra effort. With climbing skins on, we both chugged our way up the hill in half the time.

Last week, I skied up the Big Slot gully over the snowshoe tracks. I removed the skins after arriving at the Buckskin-Morgan Ridge. From here, I followed ski tracks along the ridge and down to the Morgan Summit and the upper warming hut that is there. If you’ve never tried these trails, they are worth doing. It may help you to bring along a map so you won’t get lost. There is a map of the trails in the local guidebook, “Eastern Idaho Sweet Spots.”

After a snack in the hut, I skied to the Hidden Vista Overlook and on to the Hawley Gulch Overlook. These trails offer an extra loop with some nice scenery. From Morgan Summit, I returned back to the parking lot via the road down.

My second adventure was a solo trip up the little canyon off the regular groomed trails at the South Valley Trails area.

This area features cross-country trails, fat bike trails, snowshoe trails and sledding hills. The parking lot is near the Mike Harris Campground. One of the loop trails goes through the Mike Harris Campground.

I headed up the groomed trail on the road from the parking area, then turned off on a self-groomed trail (not on the trailhead map) heading up a canyon and following a small stream.

The route turned out to be adventures in stream crossings with the previous skier bravely finding snow bridges across the stream. I liked the texture of the snow on this non-groomed, unpacked trail. Most of the time the stream was no wider than a yard or so and 6 inches deep, but I still didn’t want to make a splat in the running water. I guessed I was following an alpine-touring skier heading up into the hills looking for turns. The skier was obviously using climbing skins, but I stubbornly decided to make a go of it on my waxless skis. There were a few times when the going got steep, and I had to resort to side-stepping.

I only managed to sneak up into the canyon about a mile or two before it was either put on the skins or turn around. The way had narrowed to the point that sidestepping was not going to be an option. I opted to turn around.

The return trip was a zoomer, with a couple awesome crashes, due to unexpected dips or branches reaching out and grabbing me.

As I neared the junction with the groomed trails, I met a couple coming up the trail who asked about the way ahead.

“Adventures in stream crossings,” I said.

The woman was ready to turn around, but the guy she was with persuaded her to keep going “at least until it gets dicey,” he said.

Personally, I enjoyed the adventure of skiing through the deep forest on a self-groomed trail and wondering if the snow bridges were going to hold my weight over the stream below. I figured it wasn’t a life-and-death situation. At worst, I’d get a bit wet and probably embarrassed when I met other skiers. Being embarrassed is not a new thing for me.

Jerry Painter is a longtime East Idaho journalist and outdoorsman.

Now for the gun shows

I love the show season. And if you’ve been reading any of my articles lately then you know I’ve been flying around the country hitting the Dallas Safari Club Convention & Expo, the Safari Club International Convention and the mother of them all, the SHOT Show.

Even though I love the big shows, I have to admit. I’ve been stretched out thin. Between giving seminars at all of them and working the shows from daylight to dark, maybe flying in late to one of them at 2:30 a.m. and getting up some mornings at 4 to write articles covering them — I was drained by the time I flew home from the last one on a Saturday night at midnight. Only to have to get up at 3:30 to fly out again for two and a half weeks on Wednesday morning.

But now it’s time for some more relaxing type of shows. Gun shows! I don’t think that I’ve ever been to a gun show that it didn’t have something that I couldn’t live without. Gun shows have something for everyone.

If you need a brand new rifle, shotgun or pistol have no fear, you’ll find it there. Want an old M1 Garand? Saw a collection of them today. What about cowboy pistols? Yep, you’ll see a plethora of them.

Then there’s always a few vendors with a ton of old Army gear. Then if you’re looking for knives, you’ll find a ton of them. A lot of old school leather handle knives on up to some modern ones that are good for … I just don’t think their use has been discovered as of yet.

Knives that fit into my hunting world, I usually don’t see too many of them — although today I did.

And who isn’t infatuated with old lever actions? There are always a few tables of them that I have to stop and google over. The old lever action has to be the coolest rifle ever designed, doesn’t it? They’re the gun that won the West and still win the heart of any true westerner. I shot a cinnamon bear a few years ago with a Henry’s Golden Boy 45-70. That made for a beautiful picture with the brass lever action laid on the cinnamon bear.

If you need some décor for a mountain cabin, I don’t know how you could do better than hit a gun show and grab a box full of old-school ammo boxes to set up on a shelf. I saw a guy that had a whole box of old ammo boxes for sell today.

Usually at every gun show I can find at least one deal on a couple of boxes of ammo that I need. But one word of caution. I’d advise against buying any ammo reloaded by some individual local. Years ago I bought some at a Nampa Gun Show and it nearly blew the firing pin back through the end of the bolt. It was protruding out the back of the bolt. Little Tommie’s forehead would have been the next stop. So only buy reputable ammo.

One thing that I really like to stumble upon is a unique local dealer. One year at the La Grande gun show I met a guy that sold imported knives from Finland. They were unique. The handles were made out of reindeer horns. He had a mushroom knife that had boars’ bristles on the end of the handle to brush dirt off of your mushrooms as you gathered them.

Today I met a young man named Justin that owns Dakota Prairie Ammunition. They manufacture ammo, of course. I’m going to be testing some of his ammo. I love helping guys that are just getting their feet on the ground and many times you’ll be able to meet a new fledgling company at your local show.

Some upcoming gun shows in Idaho include: The Amoureux Homedale Gun Show on Feb. 19 and 20 and The Boise Gun Show at the Ford Idaho Center on March 5 and 6.

So don’t just set around the cabin bored this winter. Get out and hit a gun show. If nothing else I always see a few old-time books that I can’t pass on. Have fun.

Tom Claycomb lives in Idaho and has outdoors columns in newspapers in Alaska, Idaho, Utah, Nevada, Colorado and Louisiana. He also writes for various outdoors magazines and teaches outdoors seminars at stores like Cabela’s, Sportsman’s Warehouse and Bass Pro Shop. He can be reached via email at smileya7@aol.com.

Going for the pretty stuff along the Buffalo River

For my sweetheart, this is a must-do trail every winter.

We showed up on a Tuesday and had the Buffalo River trail in the Island Park area all to ourselves.

Julie likes the trail “because it’s pretty.” That seems to be a thing for the ladies. I will admit, with the sun shining, the bluish river flowing and the thick, snowy woods, the trail is a beaut. It’s also flat. That makes it a great trail for a group of mixed levels of experience.

The trail begins just out of the parking lot of the Island Park Forest Service Ranger Station just south of Pond’s Lodge. The access couldn’t be easier.

The trail is a “Park ’N Ski” trail, meaning that skiers/snowshoers are asked to purchase and place a Park ’N Ski sticker on their windshield for the winter season. The money goes to pay for the cost of grooming the region’s ski trails. Three-day permits can be purchased for $7.50 and annual permits can be purchased for $25. Find the permits online at the Idaho Parks and Recreation website.

The 2-mile trail makes a big loop just south of the Buffalo River on the east side of Highway 20. If you’re looking for some more mileage after doing this trail, drive a quarter of a mile north to Pond’s Lodge and park just south of the lodge’s parking lot at the Moose ski trails. This trailhead connects into a series of trails continuing along the Buffalo River and over to the Island Park Reservoir dam area with options to do several miles of varied terrain.

The Buffalo River trail is set up as a self-guided nature trail with occasional factoid signs along the way talking about the geology, local animals, waterfowl, fish, etc. We found that we usually had to scrape the snow off the signs in order to read them. A long section of the trail parallels the river. We were hoping to see some water birds in the river, but the only birds we saw were off in the distance downstream west of the Highway 20 bridge.

The Buffalo River is a shallow river a few miles long that flows in a southwesterly direction and connects with the Henry’s Fork of the Snake River just south of Island Park Reservoir. This mellow river attracts anglers hunting brook trout and canoes looking for a mellow place to paddle during milder weather months.

We did see a few moose tracks in the snow, but it was a day for all the critters to be somewhere else.

Yellowstone National Park has updated its backcountry reservation system to allow people to do it all online.

Beginning this spring, visitors will be able to make advance online reservations for backcountry permits at www.recreation.gov.

The park said moving to an online system allows backcountry users to check availability in real time and receive instant confirmation when reserving a trip.

Starting March 1 through March 20, the system will offer a lottery system for backcountry permits.

From April 1 to April 24, people will be able to reserve single reservations online.

Starting April 26, people can reserve additional reservations.

After April 26, the remaining permits will be available for reservation on www.recreation.gov.

Walk-up permits will be available on a first-come, first-served basis up to 48 hours in advance. Walk-up permits cannot be reserved online. Fees apply for all backcountry sites.

“Early access lottery and general permits will account for approximately 75 percent of permits issued for the season,” Yellowstone National Park said in a news release. “The remaining permits will be available as walk-up permits.”

So it sounds like if you want to get that prized backcountry campsite for this coming summer, you’d better get online this spring.

Yellowstone offers more than 1,000 miles of trails and 293 designated backcountry campsites, the park said. Permits are required for all overnight stays in the park’s backcountry.

Jerry Painter is a longtime East Idaho journalist and outdoorsman.

Dark dreary winter or glorious snow heaven?

If you read any writings that are 50 years or older, anytime they wrote about winter there was a dark foreboding sinister feeling portrayed about it. There were cliches like they were entering into the winter of life and you knew they were about to die. You could almost hear the creepy music playing in the background.

As a kid, I didn’t have a lot. When I was 8 years old I’d pull on two to three pairs of socks and cram my foot into my already tight pair of cowboy boots. My toes would have zero circulation. I’d be shivering like a cartoon character.

Even up until after college I thought I was decked out if I had a set of red one-piece Union long handles. Of course they were made out of cotton and we now know that cotton doesn’t wick away moisture. In those days everyone advised wearing wool because it wicks away moisture and you’d survive even if you got wet. But the downside, wool itches.

Fast forward 50 years. Now suddenly a big percentage of people can’t wait for winter! You have to wonder, what caused this big shift in the paradigm? Here’s my explanation. Now we have a ton of fun winter outdoor activities. Skiing, snowboarding, ice fishing, snowshoeing, snowmobiling, cross country skiing, winter camping, sledding, ice skating, varmint hunting and who knows what else?

And I think the thing that allowed this change is the availability of new winter clothing that the market offers. Let’s list some of those items from the toes on up.

FOOTWEAR

Manufacturers offer moisture-wicking socks from medium weight on up to thick. Thirty years ago, there was a trend to wear a thin pair of polypropylene socks under your regular pair. This did two things.

1. Wicked away moisture.

2. The socks slid on each other so you didn’t get a blister.

Now there’s a design of boots to fit your every activity. As a kid, I never heard of waterproof boots, but now, nearly all of them are waterproof. (Although in a meeting with marketing guru Ethan Peck with Garmont boots last week at the SHOT Show he told me that sometimes he likes non-waterproof hiking boots because they are better at wicking away moisture. Never heard that before but it makes sense.)

You can get various heights of boots according to how much snow you’re going to encounter. You can also get varying degrees of insulation in them, according to how cold it is or how sedentary your outdoor activities will be. When snowmobiling or ice fishing you may want some Sorel Pac type of boots.

If you’re new to Idaho and haven’t used gaiters before, you need to get a pair. They’re a plastic like/canvas deal that zips up around your ankle and extends almost up to your knee. They clip onto the string on your boots and prevent snow from coming in over the top (curse of all curses).

BASE LAYERS

According to how active that you’re going to be but you can get light, medium and heavy weight base layers. Most are made out of polypropylene and some of silk. These are a must have in cold weather. Don’t get cotton. Remember the old saying, “Cotton Kills,” said because cotton gets wet and clammy.

For pants, it’s nice to have something that is water resistant. It may be cool looking in town but you don’t want your pants skin tight. You want them a little baggy. For a shirt, wool is great but I usually end up wearing some kind of a cotton shirt (flannel, etc.).

If you’re new to Idaho, you need to learn how to layer. You don’t want to wear just one jacket like an oversized Eskimo jacket. Otherwise, you get a little warm hiking and you have to tough it out or pull off your monster size jacket and freeze.

Maybe wear a decent fleece jacket and then a bigger coat over it. That way if you get warm you can just pull off your bigger outer jacket and strap it on your backpack. For a jacket you want one that goes past your waist to block the wind and contain your body heat. And talking about wind, you want one that is windproof and water resistant. And never, never buy a coat without a hood. Otherwise, wind will whip down your neck as well as snow and rain. I always wear a cap. Throw the hood over it and the bill sticks out and protects your face/glasses against the rain and snow.

A gaiter is nice to wear around your neck to keep wind from whipping down your collar. For head cover, everyone now wears some kind of sporty beanie. For extreme weather, Katy bought me one years ago that is four-layers. It’s the ultimate.

Then of course you’ll need some good waterproof/resistant gloves or mittens. You can also supplement with hand warmers to stick in your gloves or pockets.

Well, I could go on for a while but this list ought to at least be enough so you’ll live to make it back to town alive and be able write me some hate letters to the editor pointing out some item I forgot to include!

Tom Claycomb lives in Idaho and has outdoors columns in newspapers in Alaska, Idaho, Utah, Nevada, Colorado and Louisiana. He also writes for various outdoors magazines and teaches outdoors seminars at stores like Cabela’s, Sportsman’s Warehouse and Bass Pro Shop. He can be reached via email at smileya7@aol.com.